Mesos Hello world in Scala
In previous post, we installed mesos on ubuntu. In this post we are going to look at simple hello world on mesos. Here we are going to code a distributed shell which runs shell commands on any machine on the mesos cluster.
This post assumes that you have running mesos. If not, install and configure mesos using this post.
tl;dr you can get complete code for the example on github.
Mesos framework
Every application running on mesos is called as framework. In our example, our framework will be called as Distributed shell and it will be coded using Mesos Java API.
Mesos framework components
Every mesos framework has three important components
-
Client
Client is code which submits the tasks to the framework. Task is an abstraction used by mesos to indicate any piece of work which takes some resources. -
Scheduler
This is the important piece of the framework. A scheduler implement Mesos Scheduler interface. Scheduler takes tasks from client and runs on mesos cluster. -
Executor
Executor sets up environment to run each task given by client. Scheduler uses this executor to run each task. In this example we will use default executor provided by the mesos.
You can read more about mesos architecture here.
Distributed shell on Mesos
Let’s start coding simple hello world example on mesos. We will discuss each individual pieces of framework one by one.
Client
Mesos client is a simple Scala program which creates instance of Scheduler and submit tasks to it.
Mesos uses Google protocol buffer internally to do serialization. So each data structure in mesos follows builder design pattern.
The following are the steps to create the client
- Create framework info
Each framework running on mesos should identify itself using framework info data type. Usually framework info contains framework name, user information etc. Here we set our framework name as DistributedShell. All other properties are set to default.
val framework = FrameworkInfo.newBuilder.
                setName("DistributedShell").
                setUser("").
                setRole("*").
                setCheckpoint(false).
                setFailoverTimeout(0.0d).
build()- Create instance of Scheduler
Once we have framework info, we create instance of our scheduler. You can have multiple instance of scheduler running on mesos cluster at same time.
val scheduler = new ScalaScheduler- Submit tasks
scheduler.submitTasks(args:_*)- Start mesos driver with our scheduler and framework
Mesos driver is the API which takes specified scheduler and framework info to create instance of scheduler on mesos cluster.
//url pointing to mesos master
val mesosURL = "localhost:5050"
val driver = new MesosSchedulerDriver(scheduler,
    framework,mesosURL)
//run the driver
driver.run()
You can access complete code listing here.
Scheduler
ScalaScheduler is our framework scheduler which extends Mesos interface Scheduler. There are many call backs provided by Scheduler API, but here we are going to only concentrate on resourceOffers.
resourceOffers callback is called when mesos has some free resources. A resource can be memory,cpu or disk. So whenever there is a free resource, we submit a task.
- Create resource request for the task
For every task we submit to the mesos, we have to specify it’s resource requirements. In this example we are specifying that we need 1 CPU to run our shell command.
val cpus = Resource.newBuilder.
           setType(org.apache.mesos.Protos.Value.Type.SCALAR).
           setName("cpus").
           setScalar(org.apache.mesos.Protos.Value.
           Scalar.newBuilder.setValue(1.0)).
           setRole("*").
build- Generate task id
Each task inside a framework, is identified using a taskid.
val id = "task" + System.currentTimeMillis()- Create taskinfo using command
After having resource information and task id, we create a task object. Here we are not specifying any specific executor to run the task. In this case, mesos will use its default executor named CommandExecutor.
val task = TaskInfo.newBuilder.
           setCommand(cmd).
           setName(id).
           setTaskId(TaskID.newBuilder.setValue(id)).
           addResources(cpus).
           setSlaveId(offer.getSlaveId).
build- Launch the tasks
Once we have all the information ready for a task, we launch that task on the cluster.
driver.launchTasks(offer.getId, List(task).asJava)You can access complete code listing here.
Running
Download complete project from github.
- Build
mvn clean install- Running
Every mesos application needs mesos shared library to be available in it’s path. It’s usually found in path $MESOS_HOME/src/.libs. You can specify it using _java.library.path.
The following is the command to run the example which will echo hello on mesos cluster.
java -cp target/Mesos-0.0.1-SNAPSHOT.jar
-Djava.library.path=$MESOS_HOME/src/.libs
com.madhu.mesos.DistributedShell "/bin/echo hello"
You can also run many commands at a time.
java -cp target/Mesos-0.0.1-SNAPSHOT.jar
-Djava.library.path=$MESOS_HOME/src/.libs
com.madhu.mesos.DistributedShell "/bin/echo hello" "/bin/echo how are you"
Output
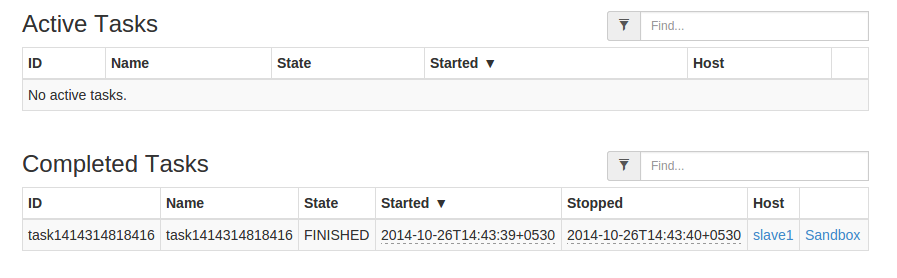
After running the example, you can see the output through mesos web interface. Navigate to localhost:5050
Here you should be able to see one task finished like below image.
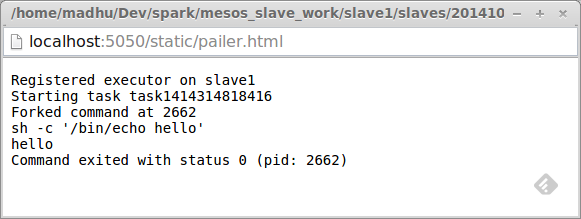
click on sandbox link. You will be able to see the page as below

click on stdout link. You will be able to see the output as below
If you have ran multiple commands, then you will see multiple tasks.