Building Agentic LLM Workflows with LangGraph - Part 1: Hello World
Agentic workflows have revolutionized the way we build LLM applications. Agent gives developers fine-grained control to express complex workflow logic in a structured way. This helps us express workflow logic in a modular manner which is easy to maintain and extend.
LangGraph is one of the frameworks that provide the tools to build agentic workflows. The API of LangGraph is heavily inspired by graph based frameworks that are found in big data frameworks like Hadoop and Spark. Some of the concepts also have similarities to frameworks like actor frameworks like Akka.
So in this series of blogs, I am going to explore different aspects of LangGraph API and show how the core concepts help us to build the different kinds of workflows using graph abstractions. The focus will be not just on LLMs, but also on core concepts of LangGraph which will help the developer to understand different abstractions that are available.
This is the first blog in the series where I introduce LangGraph with the simple hello world example. You can access the posts in the series here.
Installation
You can install LangGraph using below command
pip install -U langgraphDefining Hello World Agent
In the LangGraph, all the agent logic happens in the node and communication happens over the edge. So we are defining a simple “hello_world_agent” node to return the hello world message.
from langgraph.graph import MessagesState

def hello_world_agent(state:MessagesState):
    return {"messages":["hello world"]}
A node can be defined as a simple Python function. The first parameter is the state which signifies all the activities that are done before this node is invoked. As of now, we can ignore it.
In our function body, we are returning hello world message as a dictionary called messages. This is one of the ways a node communicates with another node.
Building the Graph
Once we have defined our hello world agent node, we are going to build the graph.
from langgraph.graph import END, START, StateGraph

graph_builder = StateGraph(MessagesState)
graph_builder.add_node("hello_world_agent",hello_world_agent)

graph_builder.add_edge(START,"hello_world_agent")
graph_builder.add_edge("hello_world_agent",END)
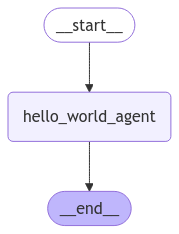
In our code, first we create a graph builder with some empty state. Then we add our node to the graph builder. After that, we add edges from special node START and END to complete the graph.
Graph Compilation
Once the graph is complete, we are going to compile the graph which will check all the conditions to make sure the graph is valid.
graph = graph_builder.compile()Visualise the Graph
We can visualise the graph using the below code
from IPython.display import Image, display

try:
    display(Image(graph.get_graph().draw_mermaid_png()))
except Exception:
    # This requires some extra dependencies and is optional
    pass
The graph looks as below

Running the Graph
We can run our graph using below code.
for event in graph.stream({"messages": ["hello"]}):
    for value in event.values():
        print(value)
The output will be
{'messages': ['hello world']}Code
You can find complete code at notebook on github.
Summary
In this post, we have learnt how to express a simple agent using LangGraph framework.